Double Cinnamon Biscotti

biscotti double cinnamon n

Cinnamon is magical. It should be included in your diet because of all its health benefits, right? Some say cinnamon may cut your risk of heart disease. Other research will tempt you with cinnamon’s high quantity of antioxidants. I say just enjoy the flavor of this spice and the way it adds a layer of sweetness without adding sugar. For me, cinnamon conjures sweet and savory memories, from warm Indian dishes created in our cozy kitchens around the world to sweet baked creations with hot cups of tea on cold days.

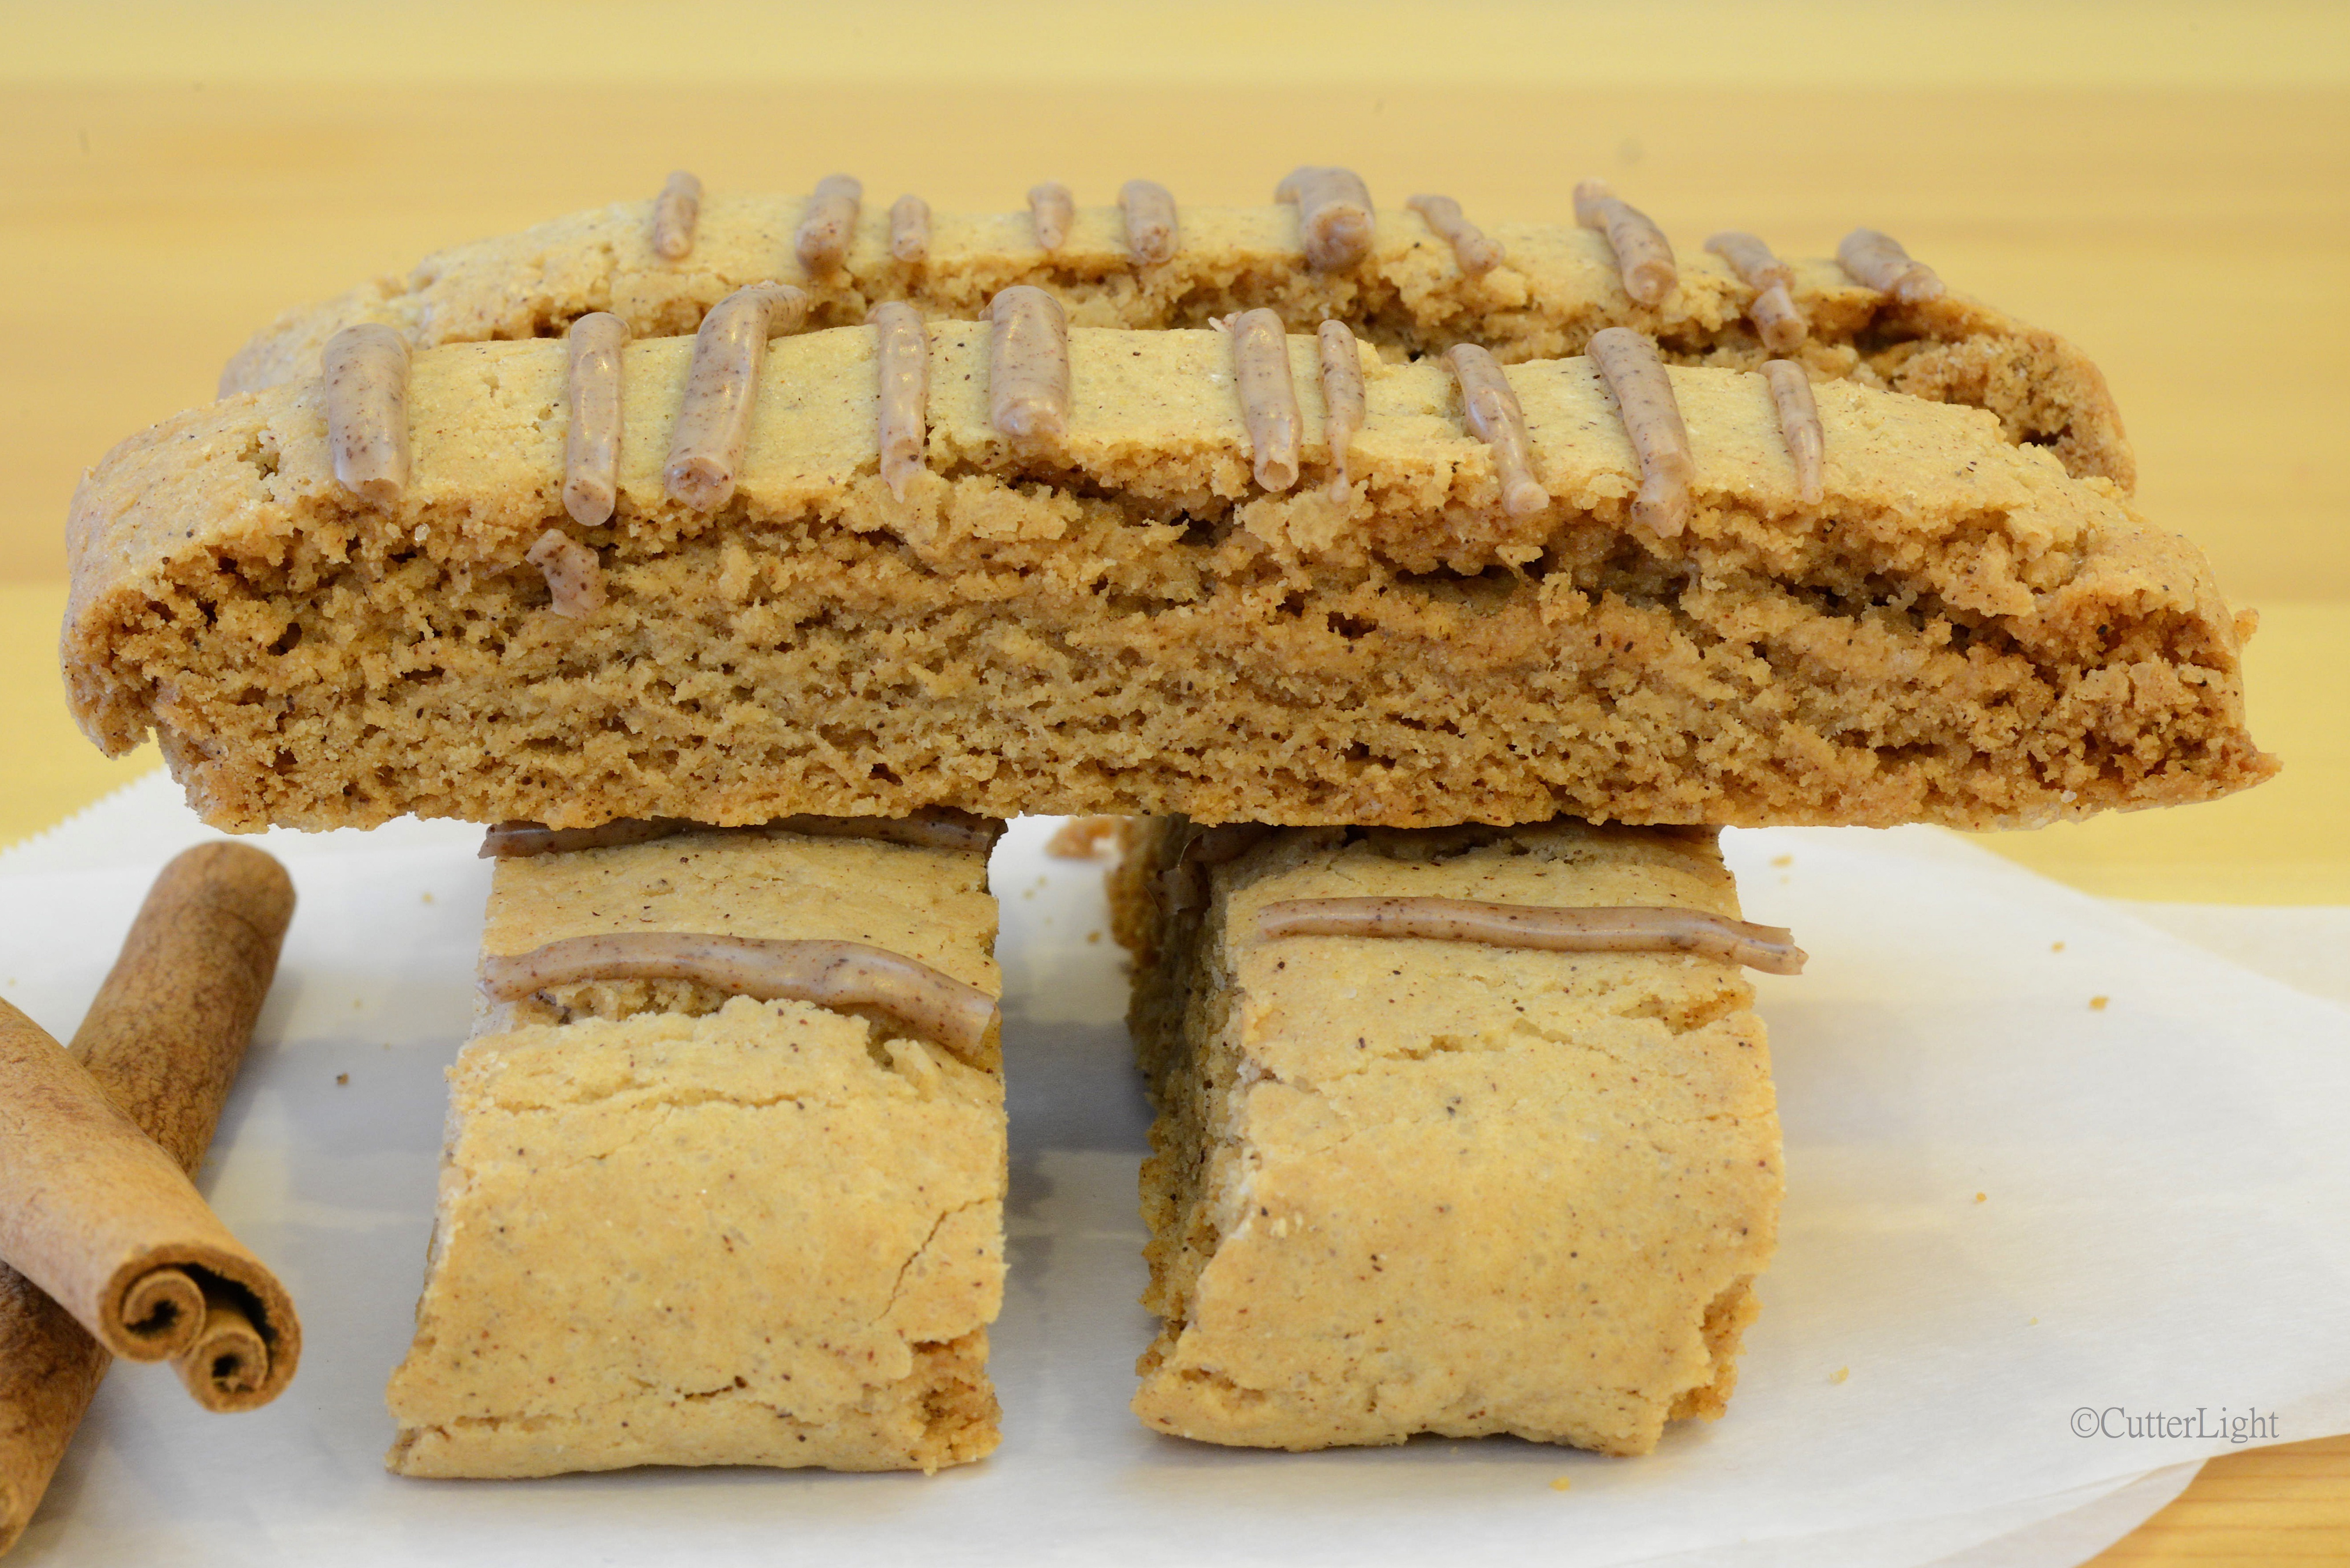
The latter memory inspired today’s cookie creation – double cinnamon biscotti. I generally lean toward soft cookies. Biscotti are the crunchy exception. Paired with a hot beverage, the speckles of cinnamon in the cookie and the sweet stripes of cinnamon icing atop the biscotti make for a winning combination.

Double Cinnamon Biscotti

Ingredients

  • 2 cups all purpose flour
  • 2 1/2 tsp ground cinnamon
  • 1 tsp baking powder
  • pinch salt
  • 2/3 cup granulated sugar
  • 3/4 cup unsalted butter, melted
  • 2 eggs
  • 1 tsp vanilla extract

Drizzle

  • 1/2 cup confectioners’ sugar
  • 1 tsp ground cinnamon
  • 1 tbsp whole milk

Directions

  1. Preheat oven to 325 degrees F (165 degrees C). Line a baking sheet with parchment paper. Set aside.
  2. Sift together flour, cinnamon, baking powder and salt in medium bowl.
  3. In a large bowl, stir together butter and sugar.
  4. Stir in eggs, one at a time.
  5. Mix in vanilla extract.
  6. Thoroughly mix in flour mixture into egg mixture, half at a time.
  7. Divide dough in half.
  8. Shape 1/2 of dough into a long log on baking sheet, about 1 1/2 inches wide and about 9 inches long.
  9. Repeat with other 1/2 of dough. Give logs space in between because dough will spread during baking.
  10. Bake biscotti for about 15 minutes.
  11. Remove from oven and cool for about 15 minutes.
  12. Cut logs into 1/2 slices with a serrated knife.
  13. Place sliced cookies back on baking sheet and bake for 15 additional minutes.
  14. Flip cookies to opposite side and bake for 15 additional minutes.
  15. Cool on wire racks.
  16. Make drizzle by mixing confectioners’ sugar, cinnamon and milk.
  17. Place drizzle in a zip top bag and snip off a tiny piece of bottom corner.
  18. Squeeze drizzle over cooled biscotti. Let drizzle set before serving.
  19. Store leftover cookies in airtight container.

A Taste of Spring – Lemon Poppy Seed Drizzle Cake

Lemon Poppyseed Drizzle Cake n

Moist and not overly sweet, lemon poppy seed cake is a quick way to brighten up a cold winter day.

This afternoon, the sunshine poured through the living room window, filling our third floor apartment with warmth and the illusion that it wasn’t as cold as it actually is outside. But no mistake, we’re still deep in winter’s grip here in Ulaanbaatar. Today, the temperature soared to a chilly high of 17 degrees F – a bit warmer than it’s been the past several days. Snug inside our apartment, we fantasized about spring while we sat in the sunbeams enjoying warm pieces of moist lemon poppyseed cake with freshly brewed cups of tea.

Lemon Poppy Seed Drizzle Cake

Ingredients

  • 3 cups all-purpose flour
  • 1 tsp salt
  • 1 1/2 tsp baking powder
  • 2 tbsp poppy seeds
  • 2 1/4 cups granulated sugar
  • 1 tbsp lemon zest
  • 1 cup vegetable oil
  • 3 large eggs
  • 1 1/2 cups plain yogurt
  • 2 tsp almond extract
  • 1/2 cup lemon juice

Drizzle

  • 1/4 cup lemon juice
  • 3/4 cup powdered sugar

Directions

  1. Preheat oven to 350 degrees F (175 degrees C).
  2. Grease two regular-sized loaf pans.
  3. In a large mixing bowl, whisk together flour, salt, baking powder, poppy seeds, sugar, and lemon zest.
  4. Stir in oil, eggs, yogurt, almond extract, and lemon juice.
  5. Pour batter into prepared pans.
  6. Bake for 50 – 55 minutes, until a toothpick inserted into center of cake comes out clean.
  7. Mix together drizzle ingredients.
  8. Prick cake many times with tines of a fork while warm.
  9. Brush drizzle on top of cake allowing the drizzle to settle into the cake.

Individual Apple Pies (You Don’t Have to Share)

individual apple pies n

All the pleasures of indulging in a whole pie without the downside of consuming a regular-sized pie – these individual apple pies feature sautéed Fuji apples in a brown-sugar-speckled crust topped with gooey caramel dulce de leche sauce.

We love desserts that could, in theory, be shared but are best enjoyed on your own. Click the links to see these delicious ways we’ve end meals with individual serving desserts: pecan persimmon upside down cake, anniversary crème brûlée, fall harvest cakes and, of course, molten lava chocolate cake.  Individual miniature desserts are especially enjoyable because you can savor the textures and flavors of the entire pie.

Individual Apple Pies

Ingredients

Crust

  • 2 1/2 cups all purpose flour
  • 1 tsp salt
  • 2 tbsp dark brown sugar
  • 1 cup frozen, unsalted butter
  • 14 tbsp ice cold water

Filling

  • 5 large Fuji apples, peeled, cored and chopped into 1/4 inch cubes (6mm)
  • 2 tbsp unsalted butter
  • 1 tsp ground cinnamon
  • 3 tbsp dark brown sugar

Directions

  1. Liberally grease a 12-muffin tin with butter. Set aside.
  2. Make dough. Whisk together flour, salt and dark brown sugar in a medium bowl.
  3. Using a cheese grater, grate frozen butter into flour mixture. Stir so that butter is evenly distributed in flour mixture.
  4. 1 tbsp at a time, mix ice water into flour mixture until dough comes together. Knead a few times on a floured surface. Form dough into a flattened disc. Wrap in plastic wrap and chill for at least 30 minutes.
  5. While dough is chilling, make apple filling.
  6. Melt butter over medium heat. Add apples, cinnamon and dark brown sugar.
  7. Sauté apple mixture for about 8 minutes. Apples should be firm but soft enough to pierce with a fork. Set aside to cool slightly.
  8. Place chilled dough on a lightly floured surface and roll it out to about 1/4 inch (6mm) thick.
  9. Cut circles of dough to fit muffin tin cups.
  10. Fill pies to the brim with apple mixture.
  11. Bake for 30 minutes in a 350 degree F (175 C) oven. Crusts should be golden brown when finished.
  12. Let pies cool for 10 minutes before removing them from the tin.
  13. Drizzle dulce de leche on top of pies just before serving.

Dulce de Leche Topping

Ingredients

  • 1 can sweetened condensed milk

Directions

  1. Pour 1 can sweetened condensed milk into top of double-boiler pan; cover. Place over boiling water.

  2. Cook over low heat, stirring occasionally, for 40 to 50 minutes, or until thick and light caramel-colored. Remove from heat. Beat until smooth.


A German Apple Pancake – Morning Rituals and Victuals

German apple pancake n

An inspiring breakfast: topped with a dollop of sour cream, this apple-filled pancake is like a mile-high crepe, as delicious as it is beautiful .

Morning rituals. Jack and I start every day with a hearty breakfast. This important meal is usually accompanied with a big mug of coffee or tea and a selection of a few poems, which, lucky for me, are read to me by my favorite reader.  A day that starts with healthy fuel for the body and sustenance for the mind is likely to be positive and fruitful (wink).

Our breakfast menus traditionally include items like nourishing hot cereals, egg dishes, or something freshly baked. This morning’s menu came straight from the only baking recipe book I have with me here in Mongolia, The Williams-Sonoma Baking Book. If you are only going to have one recipe book, I highly recommend this one. It includes many foundational recipes for breads and desserts which can be easily modified or experimented with. I followed the German Apple Pancake recipe to the T. It came out perfectly. I am already dreaming of this mile-high pancake with farm fresh pears featuring galangal as the centerpiece spice.

German Apple Pancake

Ingredients

  • 5 large eggs
  • 2 tsp vanilla extract
  • 1/2 cup granulated sugar (plus 1 tsp)
  • 1/3 cup all purpose flour
  • 1 tsp baking powder
  • pinch salt
  • 1 1/2 tbsp unsalted butter
  • 2 large apples, cored and cut into wedges 1/4 inch thick (6 mm). I used Fuji apples.
  • 1 tsp ground cinnamon
  • 1 tsp confectioners’ sugar (optional)
  • 1/4 cup crème fraîche. I used 20% fat yogurt.

Instructions

  1. Using a blender, or a stick blender, mix eggs, vanilla, and 1/2 cup sugar for about 5 seconds.
  2. Add flour, baking powder and salt. Blend for an additional 10 seconds. Set mixture aside.
  3. Preheat oven to 375 degrees F (190 degrees C).
  4. Place a 10-inch (25 cm) ovenproof, nonstick frying pan over medium heat and add butter.
  5. When the butter is heated, add apples and sauté until softened, about 4-5 minutes.
  6. Sprinkle apples with cinnamon and remaining 1 tsp of sugar. Stir over heat until apples are evenly covered with cinnamon and sugar.
  7. Move the apples so that they are evenly spread in the pan.
  8. Pour batter over top of apples.
  9. Reduce heat to medium-low and cook until bottom is firm, about 8 minutes. You will notice the edges are set.
  10. Transfer pan to oven and bake until the top of the pancake is firm, about 10 minutes.
  11. Remove pan from oven. Invert a flat plate over frying pan and flip the pancake onto the plate.
  12. Cut the pancake into 4 wedges and transfer wedges to individual plates. Dust each portion with confectioners’ sugar. Place a dollop of crème fraîche on each wedge and serve immediately.
  13. This pancake may inspire someone to read you poetry after they are finished eating their breakfast!

Sea Buckthorn Berry Almond Cake

sea buckthorn almond cake n

Moist, sweet almond cake with tart sea buckthorn berries baked in – served atop warm vanilla bean custard, this is a sophisticated and  flavorful dessert. Serve with sea buckthorn wine or an ice wine.

Berries are our favorite fruits. In Mongolia, we have added a new berry to our culinary collection – sea buckthorn. With 15 times the vitamin C of oranges, it’s no wonder Mongolians have long sought out this berry for its healthful benefits! We found the berries we used in this cake in our local grocery store. We’ll be on the lookout for this hardy plant in the fall in order to harvest our own.

This almond cake lends itself to pairing with a tart fruit such as currants. I made a cranberry version earlier which I adapted for the sea buckthorns. The almonds and the almond extract give the cake a delicious base that would work with a number of flavors. The cake is delicious without fruit as well.

Sea Buckthorn Berry Almond Cake

Ingredients

  • 1 cup all-purpose flour
  • 1 cup granulated sugar
  • 1/4 tsp salt
  • 1/2 cup whole almonds pulverized to the consistency of coarse flour
  • 1/2 cup unsalted butter, melted
  • 3 eggs, well beaten
  • 3 tsp almond extract
  • 1/2 tbsp dried orange zest or 1 tbsp fresh orange zest
  • 2 cups sea buckthorn berries (or another tart berry like cranberry)

Directions

  1. Preheat oven to 350 degrees F (175 C). Grease a 9-inch springform pan.
  2. Combine the flour, sugar, and salt in a medium bowl.
  3. Mix in almonds.
  4. Stir in butter, beaten eggs, almond extract, and orange zest.
  5. Fold in some of the berries. Reserve some to sprinkle on top of cake.
  6. Spread the batter into the greased pan.
  7. Sprinkle remaining berries atop cake. Slightly press them into batter.
  8. Bake for 40 minutes, or until a wooden pick inserted near the center comes out clean.
  9. Serve warm with whipped cream, ice cream, or warm vanilla custard.

Chocolate Orange Pecan Crinkle Christmas Cookies

chocolage orange pecan crinkle cookies n

Who can resist a cookie with a powdery sugar overcoat and dark chocolate peeking out from the crinkles?

When I was young, I would seek out those chocolates the shape of an orange that had to be banged on a table in order to get the slices to come apart – Terry’s Chocolate Orange, I think they were called. The reward? Delicious orange-slice-shaped wedges of chocolate infused with orange flavor. With this holiday favorite in mind, I added essence of orange to my chocolate crinkles. I also put in chopped pecans for another layer of flavor and a little crunch. Voila, a new holiday favorite is created!

Chocolate Orange Pecan Crinkles

Ingredients

  • 1 cup Dutch process cocoa powder
  • 1 1/2 cups granulated sugar
  • 1/2 cup vegetable oil
  • 4 eggs
  • 1 tsp pure vanilla extract
  • 1 tsp orange extract
  • 1/2 tbsp orange zest
  • 2 cups all purpose flour
  • 2 tsp baking powder
  • 1/2 tsp salt
  • 1 cup chopped pecans
  • 1/2 cup confectioner’s sugar

Directions

  1. In a large bowl, whisk together cocoa powder and granulated sugar.
  2. Stir in vegetable oil.
  3. Mix in eggs, one at a time.
  4. Stir in vanilla and orange extracts and zest.
  5. Sift flour, baking powder and salt into the cocoa mixture.
  6. Fold in chopped pecans.
  7. Refrigerate for about 45 minutes so the dough is nice and firm.
  8. Place confectioner’s sugar in a zip top bag.
  9. Preheat oven to 350 degrees F (175 C). Line a baking sheet with parchment paper.
  10. Using a cookie scoop, or a small ice cream scoop, scoop out a dough ball and drop it in the confectioner’s sugar, making sure it is well covered.
  11. Place sugar covered dough balls on parchment-lined baking sheet. Repeat until you’ve filled a baking sheet with 12 cookies.
  12. Bake for 15 minutes. Let cool on baking sheet for a minute before removing to wire rack.

Makes 30 generous cookies.

Blueberry Crunch Muffins – Betcha Can’t Eat Just One! Makes a Great Cake, Too

blueberry streusel cake n

A slice of moist cake stuffed with blueberries and topped with crunchy streusel makes for a great start to any day.

Jack says muffins are cake. Whether you use fresh or frozen blueberries, a batch of these muffins is easy to whip up anytime. They’re a favorite with fried eggs and fresh fruit for a tasty, satisfying brunch. Today, I made the recipe again, but in a 9-inch springform pan for a lovely snack to go with afternoon tea. A warm slice of this cake with a scoop of vanilla bean ice cream would be an indulgent way to end a dinner – and an absolutely wrong way to begin your day!

Streusel-Topped Blueberry Muffins

Ingredients

Muffin dough

  • 1 1/2 cups all-purpose flour
  • 3/4 cup granulated sugar
  • 1/2 tsp salt
  • 2 tsp baking powder
  • 1/3 cup vegetable oil
  • 2 eggs
  • 1/3 cup plain yogurt
  • 1 cup fresh blueberries or thawed frozen blueberries

Streusel Topping

  • 1/2 cup brown sugar
  • 1/3 cup all-purpose flour
  • 1/4 cup unsalted butter, melted
  • 1 1/2 tsp ground cinnamon
  • 1/8 tsp nutmeg

Directions

  1. Preheat oven to 400 degrees F (200 degrees C). Grease muffin tin or line with muffin liners.
  2. Combine 1 1/2 cups flour, 3/4 cup sugar, salt and baking powder in a large bowl.
  3. Mix oil, egg and yogurt in a medium bowl.
  4. Stir oil mixture into flour mixture until just mixed.
  5. Fold in blueberries.
  6. Fill muffin cups right to the top.
  7. Mix together streusel topping ingredients.
  8. Place even amounts of topping on each muffin.
  9. Bake for 20 minutes in a preheated oven. A wooden stick inserted into center of muffin will come out clean when muffins are done.

Makes 12 streusel-topped blueberry muffins.


Secrets for Fluffier Country Butter Biscuits

buttery biscuits n

Hot from the oven, these beautiful country-style biscuits have a down-home balance of crunchy peaks and crannies and buttery fluffiness. They’ll disappear faster than you can say “Breakfast is served!”

There are two tricks to fluffy biscuits. The first is use frozen butter. I use a cheese grater to add it to the dough while it’s still frozen. The grated butter pieces are just the right size to stir into the flour for even distribution. As the biscuits bake, buttery pockets are created and the steam released causes the dough to rise and become flaky.

The other trick is to tear the dough into biscuits instead of cutting it. Alternatively, you can use a cookie scoop to create the biscuits. Both methods produce fluffier biscuits than laying out the dough and cutting it. A traditional method of making biscuits is to use a water glass to cut them. Don’t. The glass seals the dough edges which inhibits the dough’s ability to rise. Tearing the dough is quick and allows for minimal handling. The edges of the ripped biscuits bake up into satisfyingly crunchy peaks and crannies.

Rustic Fluffy Butter Biscuits

Ingredients

  • 2 cups all purpose flour
  • 1 tbsp baking powder
  • 1 tsp salt
  • 1 tbsp granulated sugar
  • 1/3 cup unsalted butter, frozen
  • 1 cup whole milk

Directions

  1. Preheat oven to 425 degrees F (220 degrees C). Cover baking sheet with parchment paper and set aside.
  2. In a large bowl, whisk together the flour, baking powder, salt, and sugar.
  3. Grate frozen butter into flour mixture using a cheese grater with large holes.
  4. Stir butter into flour mixture until it is evenly mixed.
  5. Gradually stir in milk until dough just pulls away from the side of the bowl. Do not overstir.
  6. Turn dough out onto a floured surface and knead until dough sticks together. It will be craggy looking.
  7. Pull off pieces sized to your liking and gently flatten them to about 1 inch thick.
  8. Place pieces on baking sheet.
  9. Bake for 11 – 13 minutes. Edges will be golden brown when done.
  10. Let cool slightly before serving. Serve warm or room temperature.

As buttery as these are, Jack still slathers them with butter and adds honey. I like them “as is” unless we have a favorite homemade jam on hand.

Brownie Blondies, Blond Brownies, Brownie Double Deckers… Hey, Brownies!

brownie blondies n

When faced with a difficult choice such as brownies or blondies, my answer is both! We love dense, chewy brownies, and lots of Dutch processed cocoa makes the brownie layer in this recipe super chocolatey. Slightly caramelizing the brown sugar gives the blondie layer a rich caramel flavor. There doesn’t seem to be a clever portmanteau to name these bits of deliciousness… How about Double Decker Blondie Brownies?

Every couple of weeks I have a bake sale in my classroom. Students save up tickets and can buy various privileges, or they can choose to spend their earnings on Barbra’s Bakery. Everyone wins, right? I get to bake and they get to enjoy freshly made items created just for them. The tasty products keep them earning tickets!

Last Friday, I asked my students for some ideas. They were smitten with the blondies I’d previously whipped up and suggested a double-decker version of blondies and brownies sandwiching a layer of chocolate frosting. I love sweets, but that sounded too sweet. However, the double-decker idea was intriguing. The key would be to somehow keep the layers separate for an appealing visual effect, like a black and tan beer.

The trick turned out to be first partially baking the brownie layer and then gently layering on the blondie dough before the final bake. The concoction was a big hit with the students and also with all the lucky adults who got to participate in the tasting.

Brownie Double Deckers

Ingredients

For the brownie

  • 1 1/4 cups dutch processed cocoa
  • 1 1/4 cups all purpose flour
  • 1 tsp salt
  • 1 1/2 cups unsalted butter, melted
  • 3 cups granulated sugar
  • 5 eggs
  • 2 tsp vanilla extract

For the blondie

  • 2/3 cup unsalted butter
  • 2 cups brown sugar
  • 2 eggs
  • 2 tsp vanilla extract
  • a little less than 2 cups all purpose flour
  • 1 tsp baking powder
  • 1 tsp salt

Directions

  1. Preheat oven to 375 degrees F (190 degrees C).
  2. Line a 9 x 13 inch baking dish with foil and generously butter. Set aside.
  3. Sift together dry brownie ingredients – flour, cocoa, and salt – in a large bowl.
  4. In a medium bowl, mix together melted butter and granulated sugar.
  5. Mix in one egg at a time until all 5 eggs are thoroughly mixed in.
  6. Stir in vanilla extract.
  7. Stir dry ingredients into wet.
  8. Pour brownie batter into baking dish and bake for 20 minutes. Brownie should be just starting to set.
  9. While brownie is baking, make blondie dough.
  10. Place butter and brown sugar in a medium pot. Stir over medium heat until mixture is just melted.
  11. Let mixture cool for a few minutes, then stir in eggs and vanilla.
  12. Stir in flour one cup at a time.
  13. Stir in baking powder and salt. Do not overmix.
  14. After the brownies have baked for 20 minutes, reduce oven temperature to 350 degrees F (175 degrees C).
  15. Carefully spoon blondie mixture on top of brownies. Gently spread blondie mixture to cover brownies. Don’t worry about making the dough perfectly even, it will spread during baking.
  16. Bake double-decker for an additional 30 minutes. A toothpick inserted in the center of the brownies will come out clean when it is done.
  17. As delicious as these smell straight out of the oven, they taste best when totally cool. We served ours with freshly brewed cups of chai tea.

Recipe adapted from Rachel Ray.

Mongolian Scones: An Airy, “No Cream” Version of a Breakfast Favorite

Mongolian Scones w egg n

“Mongolian” scones, a lighter and fluffier version of their English cousin, are quick to make and a delicious start to our day in the coldest capital in the world, Ulaanbaatar.

We are part of a foodie network in Ulaanbaatar (UB) where one of the most common questions is, “Can you get ______ ingredient here?” Although UB is a thriving city of over a million inhabitants, Mongolia is still a developing country where certain items can be difficult to come by. Heavy whipping cream is one example. When we finally tracked some down, the price tag was the equivalent of 28 US dollars for a one liter container. The cost and inconvenience associated with certain items has been fostering invention as we experiment with substitutions to our recipes.

Our “Mongolian” scones are our answer to the question, “What can I substitute for heavy cream in scones?” The answer is yogurt, which is inexpensive and readily available in Ulaanbaatar’s grocery stores. The result is a lighter, less crumbly scone.

For this version, we used a large cookie scoop, overfilled, to create mounded scones. It is typical to create scones in a disc shape and to then cut them into wedges. The mounded shape allowed a nice rise and more crunchy surface area in one perfectly portioned breakfast scone to accompany our Mongolian eggs and delicious, thick-sliced Mongolian bacon.

Mongolian scones stacked n

A large cookie scoop portioned this dough into sixteen scones. An ice cream scoop would work well for slightly larger scones.

Mongolian Scones with Cranberry and Pecans

Ingredients

  • 2 cups all-purpose flour
  • 1/4 packed brown sugar
  • 1 tbsp baking powder
  • 1/4 tsp ground nutmeg
  • 1/4 tsp salt
  • 1 tsp dried orange peel, or fresh orange zest
  • 1/4 cup unsalted butter, chilled and diced
  • 3/4 cup dried cranberries
  • 1/2 cup chopped pecans
  • 1 tbsp granulated sugar
  • 2 small eggs (Mongolian stores typically carry smaller eggs than are sold in America)
  • 3/4 cup plain yogurt

Direction

  1. Preheat oven to 375 degrees F (190 degrees C).
  2. Cover baking sheet with parchment paper and set aside.
  3. Stir flour, brown sugar, baking powder, nutmeg, salt and orange peel together in a large bowl.
  4. Stir cranberries and pecans into the flour mixture.
  5. In a small bowl, whisk granulated sugar and eggs together. Mix in yogurt.
  6. Pour wet ingredients into dry.
  7. Stir ingredients until fully incorporated with a rubber spatula. Dough will be very sticky.
  8. Scoop out generous cookie scoops (2 tbsp or more) of dough and drop mounds on baking sheet.
  9. Bake for 15 minutes, until scones are golden brown.
  10. Enjoy fresh out of the oven with a fried egg and a slice of bacon.