And Then Gillie was Gone… Or… Intrepid C-Dory Thwarts Thieves!

Gillie and Canola_n

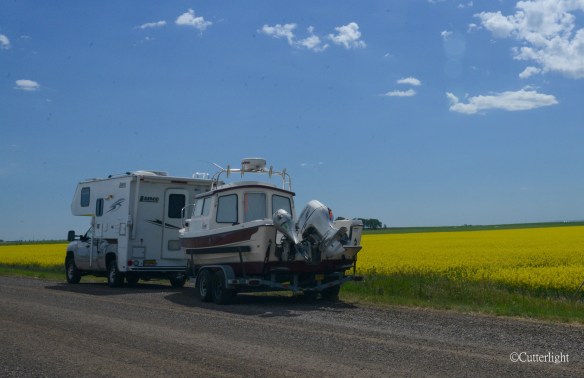
Gillie faithfully following her crew, enjoying the canola fields of Alberta.

July 18, 2016, Yukon Territory. In an incredible act of heroism, the fishing vessel Gillie, a 22’ C-Dory Angler freed herself from an attempted abduction. Following her captains north to Alaska on the Alaska-Canada highway, Gillie, along with Stanley the Chevy Silverado and Lance the Cab-Over Camper, had pulled off the highway for a driving break at the Smart Creek turn-out near the British Columbia/Yukon Territory border. Her captains were gone for mere minutes, looking for grayling and char in the trouty-looking river just out of Gillie’s view when the thugs attacked.

Armed with precisely the right tools, the perpetrators made short work of Gillie’s couplings, hitched her to their own criminal vehicle, and sped off. At this point, Gillie feared the worst. She imagined herself in a chop shop, her engines torn from her stern, her insides gutted. She shuddered, knowing she may never see her beloved captains again.

But when she shuddered, she noticed that in their haste, the thieves had neglected to properly secure the nut holding the hitching ball in place. Each time the speeding trailer hit a bump on the very bumpy Al-Can, Gillie put her own two tons of weight into the bounce. Bit by bit, the nut worked its way down the hitching ball shank.

“If I can just get free before they hit the chop shop…” She didn’t complete her thought. Not more than 50 meters up the road was a bright orange marker. She knew what that meant. Big Bump.

“This is it,” she thought, digging deep for the courage she’d need to withstand the crushing impact when the tongue of her trailer hit the pavement at 70 miles (110 kilometers) per hour. The front wheels of the thieves’ truck hit the bump, Gillie gave herself a mighty lift, the trailer wheels careened over the bump, Gillie slammed down hard on the hitching ball and, to her great joy, rebounded, catching just enough air to lift herself clear.

The tongue of the trailer came down with a heavy, metallic, grating crash! The safety chains holding the trailer to the truck went tight. Now, atop the trailer, still upright, Gillie was being dragged along while the tongue of the trailer cut a scar into the highway asphalt. From the cab of the truck, Gillie could hear loud shouting and words that can’t be printed here.

The next thing she knew, the truck was pulling off the highway. “Yea!” Gillie exclaimed in thought. But the shoulder was steeply canted. “If they go any further, I’m going to roll!” She thought in a panic.

Just in the nick of time, the whole rig skidded to a halt. The thieves burst out of their truck, cursing their “bad luck” and accusing each other. They had little choice and they knew it. Already, police between Watson Lake and Teslin were looking for the most unmistakable boat on the Al-Can. Gillie didn’t know it, but her captains had already supplied the Royal Canadian Mounted Police (who always get their boat) with a photo of Gillie and a description of a possible suspect vehicle. Gillie didn’t know this, but thanks to their friends who listened to police scanners, the thieves did know it. With a hot boat atop a disabled trailer and police on the lookout, the thieves had no choice but to cut and run.

Her captains were in the midst of a rather quiet, pensive dinner at the Yukon Motel and Restaurant in Teslin when Officer Stelter of the Royal Canadian Mounted Police entered the establishment and confidently strode toward their table, barely able to suppress a grin.

“She’s on the road, down at marker 1168. It looks like they abandoned her.”

The restaurant hostess quickly packed the dinner “to go.” The captains climbed into the Chevy, fueled up and hustled to the site, 42 miles to the east. By the time they arrived, Officer Stelter had already secured a brand new 2” hitching ball to the trailer – held fast in place with a properly tightened nut.

You never saw a bigger smile on a boat. Her captains were smiling pretty hard, too.

Bull Fight on the Al-Can

Bison Bull Fight n

Nearly a ton each, when wood bison decide to take over a piece of the Alaska-Canada highway, they do. Shooting from the deck of our C-Dory, we found ourselves surrounded by leathery thuds of muscle smacking muscle, the crack of horn on horn, hooves pounding pavement and turf as animals the size of small trucks worked themselves into sprints, snorts, grunts, bellows and the thick odor of bison. We’d been photographing more placid scenes in a herd of about 100 animals – cows and nursing calves, young bulls, grandpa bulls and The Kings – the taut-muscled mature males that stood hands higher than the other members of the herd. Aside from a few younger males occasionally testing each other with head-butts, all was tranquil. The older bulls, hump-shouldered, muscle-ripped massive beasts, grazed peacefully along with the cows and calves or rolled in dust wallows.

The dynamics changed in the blink of an eye. A couple of the big boys started snorting at each other, then locking horns hard and kicking up dust. Suddenly every big bull in the herd, including the largest bull, was on high alert, tails held high, heads lowered as they zeroed in on the point of conflict. Kicking up grass, shrubs, sand and dust, these muscle-sculpted kings moved with impressive speed in their attacks which were aimed at bellies and buttocks as well as heads and shoulders.

Vehicles on the road cautiously edged backwards to give the sparring bison sufficient berth. The motorcyclist seen on the left side of this photo turned around and headed in the opposite direction as the fight edged closer to him.

Still Life with Woodpecker

pileated woodpecker n

Traveling up Highway 1 through Oregon, heading back home to Alaska, reading Tom Robbins’ Still Life with Woodpecker along the way. Saw this pileated woodpecker in Bullards Beach State Park.

Lots of wildflowers and butterflies, too, and a herd of Roosevelt elk.

Still Life with Woodpecker

Snow and Flowers: It’s Spring in Mongolia!

yellow flower beautiful n

Our most recent heavy snow was just two weeks ago, and we’ve had a few flurries since then. But out in the countryside near Ulaanbaatar, wildflowers have begun to grow in profusion. 

snow drop mongolia n

Snow drops (above) are among the very first flowers to show.

white flowers w yellow, pink orange n

Notice the small red ant on the right side of the photo. The centers of these particular flowers reveal a tell-tale indication of their age, with the youngest flowers having yellow centers. Most of the early wildflowers are small. But they’re everywhere, and close examination they often reveals intricate beauty…

purple flower macro n

…making us wish we knew more about these splashes of color.

purple flower macro inside pollen n

pink flower macro stamens n

yellow poppy w pink n

forget-me-nots mongolia n

And happy to come across something as familiar as Alaska’s state flower, forget-me-nots.

rubarb wild n

There’s wild rhubarb, too, and wild mint and caraway are abundant.

purple flower Mongolia n

But it’s the flowers that capture our attention.

pink flower succulent n

And leave us vowing to take a botany course when we return to Alaska.

wild iris n

Bar May snowstorm n

The scene in Ulaanbaatar just over two weeks ago on May 11. 

Horse Skull, Springtime in Mongolia

horse head black n white n

Terelj National Park, May 2016. It was a hard, cold winter.


Homemade Chewy Ramen Noodles

ramen n

Homemade ramen – the adult (just better) version of that ten-cent package we used to subsist on in college.

Mongolians love their noodles. It is a staple food available in any grocery. Any Mongolian woman knows how to whip up a batch of noodles from scratch and cut them to perfection. I think nearby influences have brought in another version of a popular noodle – ramen. There are lots of tasty ramen shops around Ulaanbaatar. Some shops feature windows into the back where you can see highly skilled noodle makers tossing, spinning, stretching, and cutting dough by hand with a wizard’s touch.

I always liked ramen. But my ramen memories had always included that super-salty instant soup that I used to buy in my early college years. Both Jack and I have fond memories of throwing something into that soup to make it more healthful and more tasty. Now, I have been exposed to beautiful bowls of tasty, chewy ramen noodles swimming in flavorful broth and topped with hard boiled eggs, vegetables, and different meats. On a cold day in Ulaanbaatar, there is nothing more satisfying than a giant bowl of ramen.

Being an experienced pasta maker, I thought there was nothing to making ramen noodles. I even thought they were probably just spaghetti noodles. With that in mind, I made a batch of spaghetti and handed it over to Jack for the creation of soup. That didn’t work. Turns out, it isn’t that simple. The noodles got soggy and fell apart. My pasta-making ego was bruised. After a spell, I decided to give it a try again, this time armed with some research. What gives ramen noodles that necessary chewiness? After reading through a few websites, I decided to experiment. It seems that ramen noodles need something called an alkaline salt. One website cited that the origin of the noodles is from a place where the water has a high minerality which contributes to the texture. The most common ingredient for this alkaline salt is called kansui, which can be purchased in Chinatown. As there is no “Chinatown” in Ulaanbaatar, I needed to make my own. Thank goodness for the internet. A quick search revealed that kansui can be made at home by baking baking soda for an hour in a 250 degree F oven. Harold McGee of the New York Times explained baking the baking soda essentially changes the sodium bicarbonate into sodium carbonate which is an alkaline salt, that works perfectly in ramen noodle dough.

After a few experiments I learned that adding a little salt to the dough recipe made the noodles taste better. I never add salt to my regular pasta noodles. I also tried making noodles with all purpose flour and again with semolina flour. I happen to have a lot of semolina in my pantry right now. Turns out the noodle texture and flavor is similar with either flour, so I can say that those two flours are interchangable in this recipe.

With a successful recipe in the box, we are happily eating ramen that is 1,000 times better than the ramen both of us subjected ourselves to in college. Jack has been creating soup bases from broth, miso and even tomato juice. We’ve been adding pan fried meat like chicken or pork. Sauteed vegetables like eggplant and asparagus have entered the scene lately. Sometimes we amp up the spice by floating a bit of Cholula or Sweet Chili Sauce atop the whole dish. I’ve found that keeping portions of the noodles in ziptop bags in the freezer allows us to have the “instant meal” like the old days but with a fresh-made flavor.

Homemade Chewy Ramen Noodles

Ingredients

  • 1 cup hot water
  • 2 tbsp kansui
  • 1 tsp salt
  • 4 cups all purpose or semolina flour

Directions

  1. In a bowl, mix together water, kansui, and salt. Stir until salt is dissolved.
  2. Place flour in a large bowl.
  3. Make a well in the middle of the flour. Pour hot water mixture into the well.
  4. Using a fork, begin to blend the water and flour starting in the middle.
  5. Pull more flour in from the edge of bowl into the well in order to moisten all the flour. Continue to stir with the fork. The mixture should all look like scrambled eggs. There should not be any dry parts or really wet parts. If the mixture is too wet, add a little flour. If it is too dry, add a bit more water.
  6. When the whole mixture looks like the texture of scrambled eggs, knead it by hand until it is formed into a ball.
  7. Place ball into a ziptop bag, seal, and let rest for an hour.
  8. Divide dough into 8 pieces.
  9. Roll each piece through a pasta machine starting with largest setting (mine is 7). Keep running dough through the machine decreasing the setting by one each time.
  10. After some experimenting, I liked the texture and thickness rolled down through a 2 setting (second to smallest). Then, cut the pasta using the spaghetti cutter.
  11. Boil the noodles for 2 to 2 1/2 minutes to cook. They should be al dente. After cooking, drain them and immediately add them to your favorite broth.

Store-bought is easier, but homemade is tastier – Homemade Basil Pesto

pesto n

A bright, fresh taste that is missing in our store-bought favorite. Homemade pesto can’t be beat.

The combination of creamy pine nuts, salty parmesan cheese, bright and flavorful basil, spicy fresh garlic all combined to make a sauce that is simply magic. We douse our pasta in pesto, smear it on sandwiches, and swirl it into bread dough. We freeze big batches of basil when the leaves ripen in the summer and make fresh pesto all year long.

Homemade Pesto

Ingredients

  • 2 cups packed basil leaves (or frozen equivalent)
  • 1/2 cup grated parmesan cheese
  • 1/3 cup pine nuts
  • 3 garlic cloves
  • 1/2 cup extra virgin olive oil
  • salt and pepper to taste

Directions

  1. Place basil, parmesan, pine nuts, and garlic cloves in blender, food processor, or nut chopper attachment of a stick blender. Give the mixture a couple of blitzes to chop the basil leaves.
  2. With the  machine running, drizzle olive oil into basil mixture.
  3. When all is chopped and nicely blended, salt and pepper to taste.

Reduced Guilt Cinnamon Rolls – Banana, Wheat and Pecans, Yum!

wheat banana cinnamon rolls n

A delicious and satisfying cinnamon roll – this reduced guilt version has more fiber from the whole wheat, natural sweetness and flavor from bananas, and a pecan crunch.

A few years ago, a friend graciously helped us out with taxi service for one of our 4 a.m. flights back to the bush. After dropping us off by the ticket counter, he disappeared and quickly reappeared laden with Cinnabon cinnamon rolls for all three of us. How sweet, right? Really, how sweet! I’ve always thought there must be a way to create a cinnamon roll with lots of flavor and sweetness, but not so much sweetness that when you’ve finished eating it, you feel gut-bombed. Sorry, Cinnabon. This banana-wheat creation did the trick. The dough gets moistness and flavor from smashed bananas. The swirl of banana slices, cinnamon, sugar and nuts give you that tasty, satisfying, fun unwrapping and unrolling experience that we expect from eating a cinnomon roll. And the drizzle of glaze on the top gives a sweet Pow you’d expect on traditional cinnamon rolls without overloading them. So, go ahead and enjoy a healthier version of this breakfast treat today!

Banana Wheat Pecan Cinnamon Rolls

Ingredients

  • 2 1/2 tsp instant yeast
  • 1 cup milk (any kind of milk will work)
  • 8 tbsp unsalted butter, separated
  • 1/3 cup granulated sugar, separated
  • pinch salt
  • 1/2 cup mashed ripe banana
  • 1/2 cup sliced bananas
  • 2 cups all purpose flour
  • 1 cup whole wheat pastry flour
  • 1 tbsp ground cinnamon
  • 1/2 chopped pecans

Directions

  1. Place yeast and 1 tbsp of granulated sugar in a large bowl.
  2. Warm milk and 2 tbsp butter to 105 degrees F (40 degrees C).
  3. Stir milk mixture into yeast mixture and let stand until foamy, about 10 minutes.
  4. Mix in mashed banana and salt.
  5. Mix in flours, 1/2 cup at a time. Dough should be sticky.
  6. Knead dough on a lightly floured surface for another minute.
  7. Place dough in a bowl lightly coated with light oil, like canola. Cover with plastic wrap. Let rise in a warm, draft free place until doubled in size, about an hour.
  8. Grease an 8×8 square pan (or equivalent round). Set aside.
  9. On a lightly floured surface, roll out dough into a long rectangle which is about 1/4 inch thick (about 6 mm).
  10. Melt 4 tbsp butter. Mix in remaining sugar and cinnamon.
  11. Brush dough with butter mixture. Evenly sprinkle chopped pecans over dough. Evenly spread out banana slices over dough.
  12. Roll dough jelly-roll style. Make sure the seam side is down. Slice the dough log into 10 pieces with a serrated knife.
  13. Place cut pieces in the prepared pan. Brush the rolls with remaining melted butter. Sprinkle additional sugar and nuts on top, if desired.
  14. Cover the rolls with plastic wrap and let rise again while you preheat oven to 350 degrees F (175 degrees C).
  15. Bake rolls for 25-35 minutes. They should be slightly golden brown.
  16. Let cool slightly and serve warm.
  17. These rolls are delicious without glaze. If you need a glaze, you can make one quickly by mixing 1 cup powdered sugar with a couple of tsp of milk (glaze should be consistency of honey). Drizzle glaze over rolls.

A Homemade Spice and Seasoning Mix – Better Than Doritos!

Dorito Spices n

A mix of spices and flavors that will remind you of those chips that maybe you should be avoiding.

Awhile ago, I was at a camp with 33 students. As much fun as that sounds like it might be, I ate an entire family-sized bag of Doritos at the end of the first day to de-stress. That was the strongest thing I could find. There is something about those chips that is ridiculously addictive. I really don’t know what it is. What I do know is that those chips are not good for me. And, a whole bag? I knew better than that. Even though I enjoyed every tasty chip, I immediately went into a salt coma after finishing that bag. As much as I enjoyed the flavor of Doritos, I have not touched them since. But the flavor…

Recently, I came across a popcorn recipe that featured a spice mix reminiscent of those terribly addictive chips. Jack and I love a good date night featuring a movie and popcorn.  After tinkering with the recipe (it is no longer vegan), I have come up with a keeper. I’ve used it on popcorn and enjoyed it on homemade oven-baked potato chips which we devoured.

Better Than Doritos Spice Mix

Ingredients

  • 1 tsp garlic powder
  • 1 tsp onion powder
  • 1 tsp cumin
  • 1 tsp smoked paprika
  • 1 tsp chili powder
  • 1/4 tsp cayenne pepper
  • 1 tsp salt
  • 4 tbsp finely shredded parmesan cheese

Directions

  1. Mix all ingredients.
  2. Use to taste on popcorn, fried potatoes, grilled corn, and anything you’d imagine.
  3. Store leftovers in an air-tight container.

Whole Wheat Pita – Our Go-To Weekly Bread

whole wheat pita n

Versatile, soft and tasty pita pockets perfect for so many things – sandwiches, mini pizzas, and anything else you can imagine.

These delicious little breads are quite literally better than sliced bread. We’ve stuffed them with hummus and cucumber. We’ve enjoyed them warm along with a hearty homemade soup. Just this morning, Jack made a breakfast pizzas with these delicious pitas as the base, topped with a hearty roasted tomato sauce, mozzarella and a perfectly poached egg. We’ve even had them smeared (to Jack’s chagrin) with peanut butter and jelly for a quick and easy lunch. They’re also great stuffed with cheese and salmon and toasted.

I’ve made pita bread before using only white flour. Jack and I really enjoy the pizza crusts I make with half and half wheat and white all purpose flour. I was confident the pita would also be enjoyable with the wheat and white mixture. The wheat does add some healthful fiber, but it also adds a nice flavor and a little heartier texture. We enjoy this bread so much, I make a batch every weekend. I freeze the extra pitas and thaw them as I need them throughout the week. The thawed bread tastes like it just came out of the oven. Perfect!

Whole Wheat Pita Bread

Ingredients

  • 2 1/2 tsp active dry yeast
  • 1 tsp honey
  • 1 1/4 cups warm water
  • 1/4 cup extra virgin olive oil (plus extra for coating the bowl)
  • 1 1/2 cups all purpose flour
  • 1 1/2 cups whole wheat pastry flour
  • 1 tsp salt

Directions

  1. Stir together yeast, honey and warm water in a large bowl. Let stand about 5 minutes. Mixture should become foamy indicating the yeast is good.
  2. Stir in olive oil.
  3. Whisk in 1/2 cup of all purpose flour and 1/2 cup whole wheat flour. Mix until smooth.
  4. Stir in another 1/2 cup of all purpose flour, 1/2 cup whole wheat flour and salt.
  5. Knead in last 1/2 cups of flours until dough is smooth and elastic.
  6. Form dough into a ball and set in a clean, oil-coated bowl. Cover with plastic wrap and let rise in a warm, draft-free place. Let rise until doubled, about an hour.
  7. Punch dough down and cut into 10 equal pieces.
  8. Form each piece into a ball. Flatten and roll out into about 5 – 6 inch rounds.
  9. Cover with a clean kitchen towel and let rest for 30 minutes.
  10. Preheat oven to 400 degrees F (200 degrees C). Place baking sheet in center of oven while oven preheats.
  11. Place two pitas on baking sheet and bake for 3 minutes. Flip and continue to bake for 2 minutes.
  12. Cool baked pitas on a cooling rack and cover with a clean kitchen towel.
  13. Repeat with remaining pitas.
  14. Serve warm or store in zip top bags in the freezer.